Recent changes to wikihttps://sourceforge.net/p/nis-network-inventory-software/wiki/2024-08-19T15:05:54.867000ZRecent changes to wikiNIS - Server Installation Guide modified by Noraiz2024-08-19T15:05:54.867000Z2024-08-19T15:05:54.867000ZNoraizhttps://sourceforge.net/u/imrankhanawan/https://sourceforge.net8999aebe4362f40fc29d5686f01618fd94d5cd79<div class="markdown_content"><pre>--- v2
+++ v3
@@ -26,12 +26,12 @@
https://sourceforge.net/projects/nis-network-inventory-software/files/latest/download?source=files
-Once you have downloaded NIS_Rel_3.5_USB.img.zip file, please unzip it.
-
-NIS_Rel_3.5_USB.img.zip file has size of approximately 2.6 GB, after unzipping the file name is NIS_Rel_3.5_USB.img and file size is 4.00 GB
-Note: NIS_Rel_3.5_USB.img is raw USB disk image file, it is already bootable. You just have to burn it to the USB stick to make use of it.
-
-You will need a minimum 4 GB USB flash drive. Now burn the IMG image file NIS_Rel_3.5_USB.img to a usb flash drive.
+Once you have downloaded NIS_v5.img.zip file, please unzip it.
+
+nis_v5.img.zip file has size of approximately 4.9 GB, after unzipping the file name is nis_v5.img and file size is 8.00 GB
+Note: nis_v5.img is raw USB disk image file, it is already bootable. You just have to burn it to the USB stick to make use of it.
+
+You will need a minimum 8 GB USB flash drive. Now burn the IMG image file **nis_v5.img** to a usb flash drive.
If you are a Windows user, please use either rufus or Win32 Disk Imager application to burn the ISO image to USB flash drive. Please refer to rufus or Win32 Disk Imager guide. (You may google to find instructions)
@@ -41,7 +41,7 @@
If you are Linux user, you can use dd command to burn the image to USB flash drive.
-in Linux for example, dd if=./NIS_Rel_3.5_USB.img of=/dev/sdb status=progress
+in Linux for example, dd if=./nis_v5.img of=/dev/sdb status=progress
Explanation: dd is a linux command to burn image, if=./filename is your source image of=/dev/sdX is the usb flash device status=progress will display the progress of image transfer to USB drive. (Please check the usb device name using dmesg)
@@ -51,9 +51,11 @@
You will come to following screen.
-
-
-## Important Note: type “nuke” and press Enter key on the keyboard
+
+
+## Important Note: type “Yes” and press Enter key on the keyboard
+
+### If you do not type Yes and continue, it will timeout in 5 seconds and will continue to install NIS software to machine it booted.
Above action will format the hard disk of your server machine and install NIS - Network Inventory Software. (You will loose all your existing data).
@@ -76,6 +78,30 @@
You should be able to access the server’s web GUI interface.
Note: Please make sure your management console laptop / desktop where you are going to access the server’s GUI is configured with IP address: 192.168.1.252 subnet: 255.255.0.0, also please ensure your management desktop / notebook network PXE boot option is disabled; otherwise NIS may record your management console as a inventory item and automatically prints the barcode lable. To avoid this please disable the PXE / network boot of your management console system.
+
+##Thermal Label Printers Network Configuration
+
+USB thermal labels are no longer supported, therefore you should only use ZPL compatible thermal label with Ethernet/ Network RJ45 port. Each thermal label should be configured with IP address. When you boot inventory laptop / desktop, you may notice a screen indicating to select Warehouse location from a list of available warehouses. Each warehouse location corresponds to a specific thermal label printer in the warehouse. See below the mapping of printer names with IP addresses.
+
+Warehouse1 = IP address: 192.168.1.21 Subnet Mask: 255.255.0.0
+Warehouse2 = IP address: 192.168.1.22 Subnet Mask: 255.255.0.0
+Warehouse3 = IP address: 192.168.1.23 Subnet Mask: 255.255.0.0
+Warehouse4 = IP address: 192.168.1.24 Subnet Mask: 255.255.0.0
+Warehouse5 = IP address: 192.168.1.25 Subnet Mask: 255.255.0.0
+Warehouse6 = IP address: 192.168.1.26 Subnet Mask: 255.255.0.0
+Warehouse7 = IP address: 192.168.1.27 Subnet Mask: 255.255.0.0
+Warehouse8 = IP address: 192.168.1.28 Subnet Mask: 255.255.0.0
+Warehouse9 = IP address: 192.168.1.29 Subnet Mask: 255.255.0.0
+Warehouse10 = IP address: 192.168.1.30 Subnet Mask: 255.255.0.0
+Warehouse11 = IP address: 192.168.1.31 Subnet Mask: 255.255.0.0
+Home-Office = IP address: 192.168.1.76 Subnet Mask: 255.255.0.0
+
+You must configure each thermal label printers with IP addresses from the above list. Make sure the printer is accessible on the NIS network by pinging it's IP address.
+
+When inventory laptop / desktop boot, it prompts to select the location of warehouse, for example you have selected warehouse-2, NIS will send the label to warehouse-2 printer automatically after processing the data.
+
+This way you can have several employees working in different parts of a very large warehouse using just a single NIS server.
+
# Graphical User Interface (GUI) NIS - Network Computer Hardware Inventory
Access the GUI at following URL http://192.168.1.253
</pre>
</div>User Guide modified by Noraiz2021-11-04T13:49:04.295000Z2021-11-04T13:49:04.295000ZNoraizhttps://sourceforge.net/u/imrankhanawan/https://sourceforge.net44efd772cdf1ab71155a7620b57c3b994f72c047<div class="markdown_content"><pre>--- v24
+++ v25
@@ -19,6 +19,8 @@
## [Automated Inventory Video Tutorial part 1/2](https://www.youtube.com/watch?v=pHU42vNbjcA)
## [Automated Inventory Video Tutorial part 2/2](https://www.youtube.com/watch?v=VHfSFNP-r1s)
+
+##[NIS Screenshots and Images](https://sourceforge.net/p/nis-network-inventory-software/wiki/Screen_Shots/)
# What is NIS - Network Computer Hardware Inventory Software
NIS - Network Computer Hardware Inventory software is a LAN & server based software solution for small and large businesses wanting to automate the OS less computer hardware inventory. This software is best suited to all type of businesses such as Computer Recycling companies, enterprise and corporate organization, computer warehouses, computer import and export businesses, manufacturers and etc,.
</pre>
</div>User Guide modified by Noraiz2021-11-04T13:45:32.379000Z2021-11-04T13:45:32.379000ZNoraizhttps://sourceforge.net/u/imrankhanawan/https://sourceforge.net0ea8e9fa8bee4e26040bd901409df8e07a664410<div class="markdown_content"><pre>--- v23
+++ v24
@@ -2,16 +2,23 @@
License: This software is released with license. OSI-Approved Open Source » GNU Library or Lesser General Public License version 3.0 (LGPLv3)
Sourcecode: is available in /var/www/html and /root directory after ISO is successfully installed.
-#[NIS - Server Installation Guide](https://sourceforge.net/p/nis-network-inventory-software/wiki/NIS%20-%20Server%20Installation%20Guide/)
-#[Windows Clonning & Bulk Deployment over Network Guide](https://sourceforge.net/p/nis-network-inventory-software/wiki/Windows%2010%20Image%20Deployment%20to%20Bulk%20Systems/)
-
-#[Bulk Windows Image Capturing over Network Guide](https://sourceforge.net/p/nis-network-inventory-software/wiki/Windows%2010%20Image%20Deployment%20to%20Bulk%20Systems/)
-#[Bulk Windows Image Deployment over Network Guide](https://sourceforge.net/p/nis-network-inventory-software/wiki/Windows%2010%20Image%20Deployment%20to%20Bulk%20Systems/)
-
-#[API Guide - Integration Guide](https://sourceforge.net/p/nis-network-inventory-software/wiki/NIS%20-%20API/)
-# [Video Tutorial part 1/2](https://www.youtube.com/watch?v=pHU42vNbjcA)
-
-# [Video Tutorial part 2/2](https://www.youtube.com/watch?v=VHfSFNP-r1s)
+##[NIS - Server Installation Guide](https://sourceforge.net/p/nis-network-inventory-software/wiki/NIS%20-%20Server%20Installation%20Guide/)
+
+##[Windows Clonning & Bulk Deployment over Network Guide](https://sourceforge.net/p/nis-network-inventory-software/wiki/Windows%2010%20Image%20Deployment%20to%20Bulk%20Systems/)
+
+##[Bulk Windows Image Capturing over Network Guide](https://sourceforge.net/p/nis-network-inventory-software/wiki/Windows%2010%20Image%20Deployment%20to%20Bulk%20Systems/)
+
+##[Bulk Windows Image Deployment over Network Guide](https://sourceforge.net/p/nis-network-inventory-software/wiki/Windows%2010%20Image%20Deployment%20to%20Bulk%20Systems/)
+
+##[API Guide - Integration Guide](https://sourceforge.net/p/nis-network-inventory-software/wiki/NIS%20-%20API/)
+
+##[OS Image Capturing Video Tutorial](https://youtu.be/dN6EQjSdi9U)
+
+##[OS Image Deployment to bulk machines Video Tutorial](https://youtu.be/nC0HMYV5qkU)
+
+## [Automated Inventory Video Tutorial part 1/2](https://www.youtube.com/watch?v=pHU42vNbjcA)
+
+## [Automated Inventory Video Tutorial part 2/2](https://www.youtube.com/watch?v=VHfSFNP-r1s)
# What is NIS - Network Computer Hardware Inventory Software
NIS - Network Computer Hardware Inventory software is a LAN & server based software solution for small and large businesses wanting to automate the OS less computer hardware inventory. This software is best suited to all type of businesses such as Computer Recycling companies, enterprise and corporate organization, computer warehouses, computer import and export businesses, manufacturers and etc,.
</pre>
</div>Windows 10 Image Deployment to Bulk Systems modified by Noraiz2021-10-29T11:50:56.171000Z2021-10-29T11:50:56.171000ZNoraizhttps://sourceforge.net/u/imrankhanawan/https://sourceforge.net9c239c627d3d6cbefd919165731eccb7edf06870<div class="markdown_content"><pre>--- v8
+++ v9
@@ -7,6 +7,12 @@
### How NIS image capturing and deployment works.
The goal is to deploy Windows OS image to several machines automatically without user interaction and without using CDs/DVD/USB. NIS can capture and deploy OS image from and to bulk systems concurrently. You can view progress while capturing and deploying Windows OS image over network. See below a dashboard showing progress of image capturing.
+
+To view youtube video tutorials for image capturing and deployment, click links below.
+
+###[OS Image Capturing Video Tutorial](https://youtu.be/dN6EQjSdi9U)
+
+###[OS Image Deployment to bulk machines Video Tutorial](https://youtu.be/nC0HMYV5qkU)

</pre>
</div>NIS Introduction modified by Noraiz2021-10-29T11:48:43.042000Z2021-10-29T11:48:43.042000ZNoraizhttps://sourceforge.net/u/imrankhanawan/https://sourceforge.net397d03807cbb29d61834798e9455c562965c1bb8<div class="markdown_content"><pre>--- v27
+++ v28
@@ -2,20 +2,30 @@
License: This software is released with license. OSI-Approved Open Source » GNU Library or Lesser General Public License version 3.0 (LGPLv3)
Sourcecode: is available in /var/www/html and /root directory after ISO is successfully installed.
-#[NIS - Server Installation Guide](https://sourceforge.net/p/nis-network-inventory-software/wiki/NIS%20-%20Server%20Installation%20Guide/)
-#[Windows Cloning & Bulk Deployment over Network Guide](https://sourceforge.net/p/nis-network-inventory-software/wiki/Windows%2010%20Image%20Deployment%20to%20Bulk%20Systems/)
+##[NIS - Server Installation Guide](https://sourceforge.net/p/nis-network-inventory-software/wiki/NIS%20-%20Server%20Installation%20Guide/)
-#[Bulk Windows Image Capturing & Deployment over Network Guide](https://sourceforge.net/p/nis-network-inventory-software/wiki/Windows%2010%20Image%20Deployment%20to%20Bulk%20Systems/)
+##[Windows Cloning & Bulk Deployment over Network Guide](https://sourceforge.net/p/nis-network-inventory-software/wiki/Windows%2010%20Image%20Deployment%20to%20Bulk%20Systems/)
-#[API Guide - Integration Guide](https://sourceforge.net/p/nis-network-inventory-software/wiki/NIS%20-%20API/)
-#[User Guide](https://sourceforge.net/p/nis-network-inventory-software/wiki/User%20Guide/)
-#[OS Image Capturing Video Tutorial](https://youtu.be/dN6EQjSdi9U)
+##[Bulk Windows Image Capturing & Deployment over Network Guide](https://sourceforge.net/p/nis-network-inventory-software/wiki/Windows%2010%20Image%20Deployment%20to%20Bulk%20Systems/)
-#[Inventory Video Tutorial part 1/2](https://www.youtube.com/watch?v=pHU42vNbjcA)
+##[API Guide - Integration Guide](https://sourceforge.net/p/nis-network-inventory-software/wiki/NIS%20-%20API/)
-#[Inventory Video Tutorial part 2/2](https://www.youtube.com/watch?v=VHfSFNP-r1s)
+##[User Guide](https://sourceforge.net/p/nis-network-inventory-software/wiki/User%20Guide/)
-#[NIS Screenshots and Images](https://sourceforge.net/p/nis-network-inventory-software/wiki/Screen_Shots/)
+##[OS Image Capturing Video Tutorial](https://youtu.be/dN6EQjSdi9U)
+
+##[OS Image Deployment to bulk machines Video Tutorial](https://youtu.be/nC0HMYV5qkU)
+
+##[Inventory Video Tutorial part 1/2](https://www.youtube.com/watch?v=pHU42vNbjcA)
+
+##[Inventory Video Tutorial part 2/2](https://www.youtube.com/watch?v=VHfSFNP-r1s)
+
+##[NIS Screenshots and Images](https://sourceforge.net/p/nis-network-inventory-software/wiki/Screen_Shots/)
+
+
+-----
+
+
# What is NIS - "Automated" Network Computer Hardware Inventory - Software
NIS Network Computer Hardware Inventory software is a complete server based solution that automatically creates inventory of computer hardware machines (desktops / Laptops / servers machines) without installing any software, automatically prints barcode self adhesive thermal labels and generates comprehensive detailed reports. NIS also able to capture generalized Microsoft Windows image for redeployment to bulk machines over network. Windows Image capturing and deployment and cloning is fully automated. See below general NIS dashboard.
</pre>
</div>NIS Introduction modified by Noraiz2021-10-28T11:05:34.340000Z2021-10-28T11:05:34.340000ZNoraizhttps://sourceforge.net/u/imrankhanawan/https://sourceforge.nete4ed98e195980de57f768919ec23e8f3504a3c78<div class="markdown_content"><pre>--- v26
+++ v27
@@ -9,10 +9,11 @@
#[API Guide - Integration Guide](https://sourceforge.net/p/nis-network-inventory-software/wiki/NIS%20-%20API/)
#[User Guide](https://sourceforge.net/p/nis-network-inventory-software/wiki/User%20Guide/)
+#[OS Image Capturing Video Tutorial](https://youtu.be/dN6EQjSdi9U)
-#[Video Tutorial part 1/2](https://www.youtube.com/watch?v=pHU42vNbjcA)
+#[Inventory Video Tutorial part 1/2](https://www.youtube.com/watch?v=pHU42vNbjcA)
-#[Video Tutorial part 2/2](https://www.youtube.com/watch?v=VHfSFNP-r1s)
+#[Inventory Video Tutorial part 2/2](https://www.youtube.com/watch?v=VHfSFNP-r1s)
#[NIS Screenshots and Images](https://sourceforge.net/p/nis-network-inventory-software/wiki/Screen_Shots/)
# What is NIS - "Automated" Network Computer Hardware Inventory - Software
</pre>
</div>NIS Introduction modified by Noraiz2021-10-22T11:21:25.821000Z2021-10-22T11:21:25.821000ZNoraizhttps://sourceforge.net/u/imrankhanawan/https://sourceforge.net6340b81f1db5c3367a1d1d8988108f2ee7dbe799<div class="markdown_content"><pre>--- v25
+++ v26
@@ -3,7 +3,7 @@
Sourcecode: is available in /var/www/html and /root directory after ISO is successfully installed.
#[NIS - Server Installation Guide](https://sourceforge.net/p/nis-network-inventory-software/wiki/NIS%20-%20Server%20Installation%20Guide/)
-#[Windows Clonning & Bulk Deployment over Network Guide](https://sourceforge.net/p/nis-network-inventory-software/wiki/Windows%2010%20Image%20Deployment%20to%20Bulk%20Systems/)
+#[Windows Cloning & Bulk Deployment over Network Guide](https://sourceforge.net/p/nis-network-inventory-software/wiki/Windows%2010%20Image%20Deployment%20to%20Bulk%20Systems/)
#[Bulk Windows Image Capturing & Deployment over Network Guide](https://sourceforge.net/p/nis-network-inventory-software/wiki/Windows%2010%20Image%20Deployment%20to%20Bulk%20Systems/)
</pre>
</div>Windows 10 Image Deployment to Bulk Systems modified by Noraiz2021-10-21T10:30:51.408000Z2021-10-21T10:30:51.408000ZNoraizhttps://sourceforge.net/u/imrankhanawan/https://sourceforge.net4a12a1abf535bd16ad9893bce66c188cd355606a<div class="markdown_content"><pre>--- v7
+++ v8
@@ -6,11 +6,19 @@
### How NIS image capturing and deployment works.
-The goal is to deploy Windows OS image to several machines automatically without user interaction and without using CDs/DVD/USB. See below brief introduction.
+The goal is to deploy Windows OS image to several machines automatically without user interaction and without using CDs/DVD/USB. NIS can capture and deploy OS image from and to bulk systems concurrently. You can view progress while capturing and deploying Windows OS image over network. See below a dashboard showing progress of image capturing.
+
+
+
+See below brief introduction.
Please note: Due to difference between BIOS and UEFI systems, both images cannot be deployed on each other. For example, UEFI image can only be deployed to UEFI based system and BIOS image can only be deployed to BIOS based system.
Please note: HDD on the destination machine should be equal in size or large than the machine where master image was prepared. For Example, technicians machine has 250GB HDD, your destination machine CANNOT have HDD smaller than 250GB. However large size HDD on destination machine should work.
+
+See below a general dashboard showing all Inventory, windows os image capturing and windows os image deployment status and progress.
+
+
#### Capturing Windows OS Image over network brief overview
@@ -26,6 +34,10 @@
10. Type name of the image, meaningful name such as Dell_3510_64bit_UEFI_Windows10Pro_250GB_HDD
11. NIS server will capture the Generalized, OOBE (Out of Box Experience) image and store it in the server's database for later deployment to bulk machines.
+See below NIS Capturing Windows OS generalized and OOBE image over network (detail information)
+
+
+
#### Deploying Windows OS Image to bulk machines over network brief overview
1. Connect the machines to NIS network and boot these into PXE.
@@ -38,6 +50,14 @@
8. Your destination machine will automatically shutdown.
9. Destination machine is now equipped with Windows OS and is ready for OOBE experience.
+See below NIS is deploying Windows OS image to several machines concurrently over network PXE Booting.
+
+
+
+Also see below NIS show comprehensive details for each machine that is deploying windows OS image.
+
+
+
## Preparing Windows OS image for capturing over network
@@ -107,14 +127,32 @@

-NIS will capture images of all partitions including data, partition tables. This captured image is stored in NIS database real time.
+NIS will capture images of all partitions including data, partition tables. This captured image is stored in NIS database real time. You can capture multiple images from bulk machine concurrently.
+
+While OS image capturing is executing on the workstations (PXE booted) machines, You can view realtime and live progress from NIS web management portal. See below a dashboard showing status of all image capturing in progress.
+
+
+
+While OS image capturing is still executing on the workstations, you can view detailed information and progress by using NIS web management console for each machine who's image is being captured. See below a real example.
+
+
+
+On the client / workstation machine, when image capturing has finished its run, following is displayed.

-When image capturing process has completed, you may see following. You may press OK to shutdown this machine.
+When image capturing process has completed, you may see following. You may press OK to shutdown this machine.
+
+When image capturing has succeed, you will following on the NIS web management for that specific machine. You can see below, image capturing has finished its run and all guages are silent, this shows image has been captured successfully. You may also notice it also displays comprehensive data related to this image, such as serial numbers, Windows Build, Lab ID, COA, License keys and etc,.
+
+
When all partitions and data is captured successfully. You can safely shutdown this machine.
-The image that you have just created and captured is now ready to roll out o new machines.
+The image that you have just created and captured is now ready to roll out to new machines. You can deploy this image to large number machines concurrently. See next section.
+
+Once you have captured Windows OS image from several machines, you can view details and comprehensive reports by using NIS web management portal. See below image capturing report.
+
+
## Deploy Windows 10 Image to Bulk machines over Network PXE
@@ -159,7 +197,29 @@
See above, NIS will first create partition table depending on the type of image and type of system. (Type of partitions are auto-generated depending on BIOS or UEFI system). NIS will then continue to write the image to your destination.
+While NIS is writing the Windows OS image to machines, you can view entire networks image writing progress using NIS web management portal. See below a real example of image deployment dashboard.
+
+
+
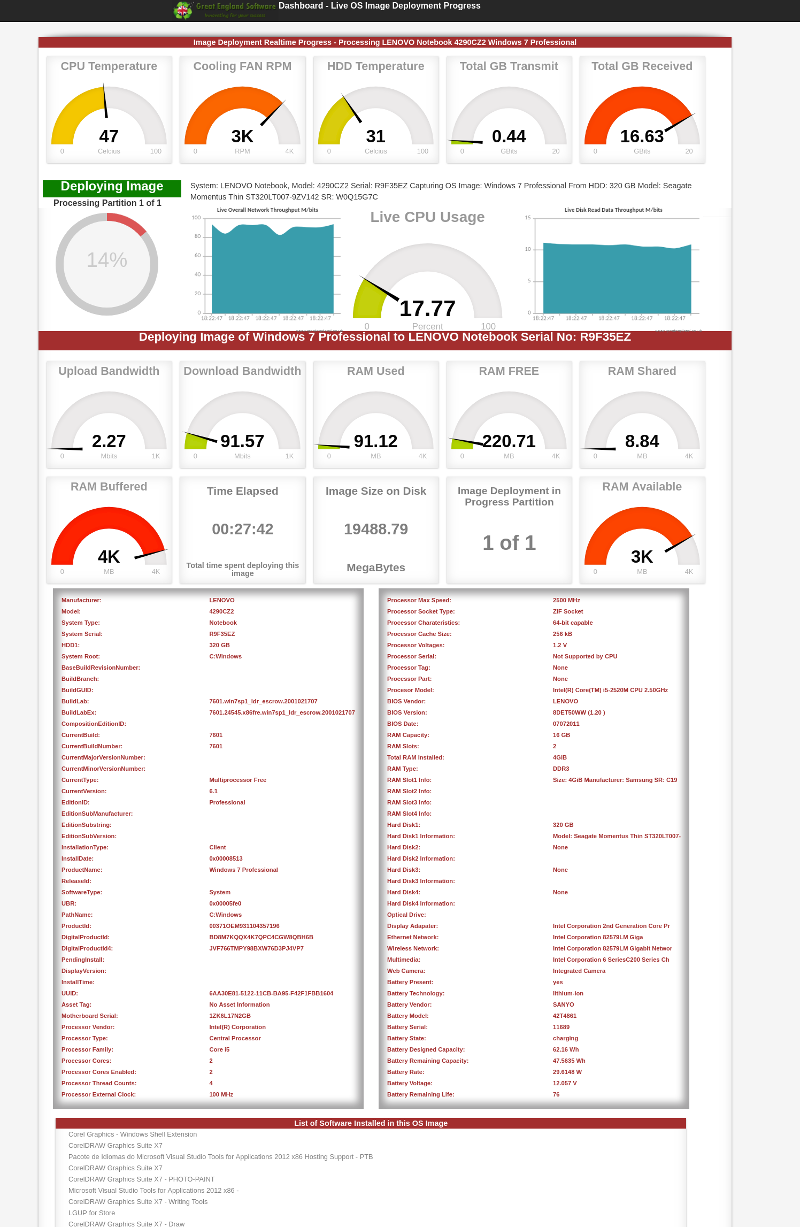
+While NIS is continuing to write the Windows OS image to several / machine(s). You can view detailed information for each deployment task by using NIS web management portal. See below an example show comprehensive details information for image deployment.
+
+
+
+See below NIS general dashboard showing real time progress of all image capturing, deployment and inventory overview.
+
+
+
+See below another example of NIS showing comprehensive and detail information for image deployment.
+
+
+
+When NIS has finished writing the image to workstation(s), you may see following on the client (workstation) where this image is deployed.
+

+
+After successful Windows OS image deployment, you may see following on the NIS web management portal. Please note status is showing Finished and all guages have dis-engaged, success message is displayed.
+
+
After successful image deployment, completion and success message is displayed. Press OK and Enter key to shutdown this machine. See above.
Once image has been written, folllowing message is displayed, you can press OK to shutdown your machine.
@@ -168,7 +228,11 @@
Congratulations, you have just finished deploying Windows 10 image to a new machine.
-Windows 10 image raw size is approximately between 25GB to 30GB. Depending on the network equipment you have used and hard disk drive throughput performance, if G/Bit switch is used it may take approximately 30 - 40 minutes to deploy the image.
+Windows 10 image raw size is approximately between 8GB to 30GB, depending on the number additional window updates and additional softwares, drivers installed. Also depending on the network equipment you have used and hard disk drive throughput performance, if G/Bit switch is used it may take approximately 8 - 20 minutes to deploy the image.
+
+Once you have deployed Windows OS image to several machines, you can view details and comprehensive reports by using NIS web management portal. See below image deployment report.
+
+
#### Note: Above is an example of deploy Windows 10 image to a single system. You can deploy captured image to several hundred systems simultaneously. Upto 65000 systems can deployed concurrently depending on the speed of your network and NIS server hardware. We also recommend Gigabit Ethernet switch is used for better performace. If you are going to deploy on very large scale then we recommend, using 40 Gbps or 10 Gbps network adapter in NIS server and use appropriate 40Gbits or 10Gbits network switch.
</pre>
</div>NIS Introduction modified by Noraiz2021-10-20T14:55:31.876000Z2021-10-20T14:55:31.876000ZNoraizhttps://sourceforge.net/u/imrankhanawan/https://sourceforge.net717b0e86ec1b4cc92f66bbe50b373281c5a63727<div class="markdown_content"><pre>--- v24
+++ v25
@@ -14,7 +14,7 @@
#[Video Tutorial part 2/2](https://www.youtube.com/watch?v=VHfSFNP-r1s)
-
+#[NIS Screenshots and Images](https://sourceforge.net/p/nis-network-inventory-software/wiki/Screen_Shots/)
# What is NIS - "Automated" Network Computer Hardware Inventory - Software
NIS Network Computer Hardware Inventory software is a complete server based solution that automatically creates inventory of computer hardware machines (desktops / Laptops / servers machines) without installing any software, automatically prints barcode self adhesive thermal labels and generates comprehensive detailed reports. NIS also able to capture generalized Microsoft Windows image for redeployment to bulk machines over network. Windows Image capturing and deployment and cloning is fully automated. See below general NIS dashboard.
</pre>
</div>Screen_Shots modified by Noraiz2021-10-20T14:43:59.552000Z2021-10-20T14:43:59.552000ZNoraizhttps://sourceforge.net/u/imrankhanawan/https://sourceforge.net739478f54ba6859a684ff52e9c62b76c46bd4f04<div class="markdown_content"><pre>--- v1
+++ v2
@@ -22,6 +22,10 @@
#Main dashboard

+#OS Image Capturing in Progress on client (workstation)
+
+
+
#Data Charts Portal

@@ -147,7 +151,83 @@
#NIS Inventory Label 102x152mm Attached to machine

-
-
-
-
+#NIS Audit Report Menu
+
+
+#NIS Audit Report Sub Menu
+
+
+#NIS Hardware Audit Report for a single machine
+
+
+#Manual Print Barcode Label Menu
+
+
+#Manual Printing Barcode label Menu
+
+
+#Manual Printing Barcode Submission
+
+
+#Barcode Menu
+
+
+#2D handheld barcode scanning menu
+
+
+#Scanned Barcodes Report
+
+
+#Brief Summary Reports Menu
+
+
+#OS Image Capturing Success
+
+
+#NIS Reports, Charts, PIE, Line, Graphs
+
+
+#NIS Reports, Charts, PIE, Line, Graphs
+
+
+#NIS Reports, Charts, PIE, Line, Graphs
+
+
+#NIS Reports, Charts, PIE, Line, Graphs
+
+
+#NIS Reports, Charts, PIE, Line, Graphs
+
+
+#NIS Reports, Charts, PIE, Line, Graphs
+
+
+#NIS Reports, Charts, PIE, Line, Graphs
+
+
+#NIS Reports, Charts, PIE, Line, Graphs
+
+
+#NIS Reports, Charts, PIE, Line, Graphs
+
+
+#NIS Reports, Charts, PIE, Line, Graphs
+
+
+#NIS Reports, Charts, PIE, Line, Graphs
+
+
+#NIS Reports, Charts, PIE, Line, Graphs
+
+
+#NIS Reports, Charts, PIE, Line, Graphs
+
+
+#NIS Reports, Charts, PIE, Line, Graphs
+
+
+#NIS Reports, Charts, PIE, Line, Graphs
+
+
+#NIS Reports, Charts, PIE, Line, Graphs
+
</pre>
</div>